Introduction to Intercom

General

General

Intercom is our main platform where we handle tickets. Below you can see the main aspects involving Intercom.

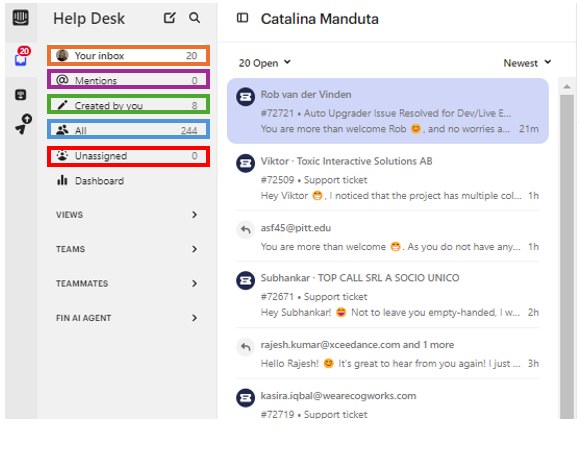
Your inbox (highlighted with an orange rectangle) - shows you all the tickets currently assigned to you;

Mentions (highlighted with a purple rectangle) - if somebody mentioned you in a conversation, you can see this here;  It is important to keep an eye on this, especially when you have an ongoing BlackOps ticket.

Created by you (highlighted with a green rectangle) shows all the messages you have created;

All (highlighted with a blue rectangle) shows all the tickets open currently;

Unassigned (highlighted with a red rectangle) - normally when somebody opens a ticket, they are assigned to the right category based on the information available on ZOHO. However certain tickets are not assigned to any category so they will end up here. 

Views

There is no need to go into many details here as many of these are related to BlackOps tickets which is the Second-Level support. 

The important part here, are the SLA groups. Tickets will be placed here based on their SLA.

Important

SLA (Service Level Agreement): An SLA is a deal between a service provider and a customer that specifies how quickly support requests or issues will be addressed and resolved. It helps ensure that everyone knows what kind of service to expect and how fast it will be.

Teams

The Teams section organizes customer inquiries based on their partnership level based on the info on Zoho. The groups are ordered by priority, with the highest priority at the top and the lowest at the bottom:

  1. Urgent/Site Down (Highest Priority): Issues with the highest priority, regardless of partnership type.

  2. Custom Enterprise Support

  3. Standard Enterprise Support

  4. Platinum Partner

  5. Gold Partner

  6. Silver Partner

  7. Professional On-Prem

  8. Professional Cloud

  9. Standard Plan

  10. Starter Plan

  11. Umbraco.com: Non-account holders contacting via Umbraco.com.

Trial (Lowest Priority): Issues from trial users.

BlackOps Queue

If you've hit a roadblock:

  • You've investigated an issue thoroughly.

  • You've checked all the usual causes, but can't pinpoint the problem.

  • You have asked your colleagues and they do not know the answer.

  • You have a complex question that needs further expertise.

  • You need help restoring a deleted project.

In these cases, you'll need to escalate the issue to our second-level support team, BlackOps. We'll cover the escalation process in more detail later in this guide.

To escalate a project, create a ticket. It will be automatically placed in this section for BlackOps to review.


BlackOps response

  • When they have a solution or follow-up question, they will move the ticket to "BlackOps response".


BlackOps AA/CR:

InfoSec

Security issues are handled by one of our colleagues. Since we do not handle security issues in regular support, we have to direct customers to the appropriate channel.

Security Issues:

Incidents

What are Incident Tickets?

We use Incident Tickets for widespread issues affecting multiple customers. Imagine a website outage with the same error message popping up for everyone. That's an incident!

Here's why Incident Tickets are helpful:

  • Tracks Affected Users: When someone reports the same issue, you can link their ticket to the main Incident. This gives us a clear picture of how many users are impacted.

  • Better Prioritization: Seeing the number of affected users helps us prioritize fixing the issue quickly.

  • Shared Knowledge: A single Incident Ticket allows developers and second-level support to see all reported cases and error details. This provides more data to diagnose and fix the problem efficiently.

We'll cover how to create Incident Tickets later in this guide.

Handover Hub

The Handover Hub is a special section within this system designed for smooth handoff of critical tickets between the USA and Europe teams. It ensures issues receive timely attention despite the time difference.

How it Works:

  • The USA or Europe team can assign high-priority tickets to the Handover Hub.

  • These critical tickets require attention during the other team's working hours:

    • For the European team, this means the tickets are assigned between 8 AM and 9 AM might need immediate attention or reassignment by the morning shift (starting at 8 AM).

Teammates Section

The Teammates section provides a list of all your support colleagues and their current ticket workload. This helps you collaborate effectively by:

  • Identifying Available Teammates: When assigning tickets from the Handover Hub (or otherwise), you can check a colleague's workload to see if they have the capacity to take it on.

  • Respecting Workload: Always consider a colleague's existing workload before assigning them a ticket. It's good practice to briefly ask if they're available before assigning.

Note

Colleagues can see if you are viewing their tickets.

Tickets vs conversations

Tickets vs conversations

For customers in high-priority groups (Custom Enterprise to Professional Cloud), ensure their message is a ticket, not just a conversation. This will allow them to access this tickets later on if they need to. You can distinguish if a conversation needs to be converted into a ticket by looking at the round icon next to the person's name.

  • Ticket Icon: Indicates an existing ticket.

  • No Ticket Icon: Convert the conversation to a ticket.

Steps to Convert a Conversation to a Ticket

1.Click "Convert to customer ticket":

2. Select "Support ticket":

3. Check the company associated with the person:

4. Add or verify the title and description (this is usually AI-assisted so make sure the pregenerated information is correct).

5. Click "Convert to ticket".

Important

After replying, change the ticket status from "Submitted" to "In Progress". This step is not necessary for Standard Plan and below as these are considered conversations, not tickets.

Additional Intercom Features

Macros

If you click on any of the tickets/conversations, go to the messages, and press the three dots as shown in the image below, you will see several features that come out of the box with Intercom.

Macros: Macros are templates or actions and text created for tasks we perform daily. The most used macros are:

  • Spam

  • Spam/Promotional

  • Closing note

  • Handing over ticket

  • Add me to the project global

The use of these macros will be described in detail later in this guide.

Fin AI

Another very useful feature is the Fin AI. This tool can be used to:

  • Summarize the conversation from the overall ticket.

  • Reformulate text you have already written to make it more friendly, formal, or simply clearer.

Important

When you use the Fin AI feature, make sure to check its output and reformulate it as it is prone to mistakes.

Reply vs Notes

As the image below shows, the Reply composer allows you to reply to the customer. In contrast, the Note composer helps you create notes for yourself or your colleagues, which will not be visible to the customers and are only visible internally.

Customer information

Finally, the customer information such as the customer contact, recent conversations quick links and so on can be found on the right side of your conversation / ticket.

Note

It is important to know that the information available here is collected from ZOHO which is our single source of truth.

Managing tickets

EU & US Ticket Prioritization

Pick up tickets in the following order, from highest to lowest priority:

1. Custom Enterprise

2. Standard Enterprise

3. Platinum Partner 

4. Gold Partner

5. Silver Partner

6. Professional On-Prem

7. Professional Cloud

8. Standard Plan

9. Starter Plan

10. Umbraco.com

11. Trial

EU Operations

At HQ, there are two teams: HQ1 and HQ2.

**HQ1 handles:**

  • Custom Enterprise
  • Standard Enterprise
  • Platinum Partner
  • Gold Partner
  • Silver Partner
  • Professional On-Prem
  • Professional Cloud
  •  

**HQ2 handles:**

  • Professional On-Prem
  • Professional Cloud
  • Standard Plan
  • Starter Plan
  • Umbraco.com
  • Trial

EU teams need to pick up EU tickets from the US when they are unassigned and have notes and next steps included. If there is an urgent need from the customer, EU teams should hand over tickets to the US. Use Handover Hub for handing over urgent tickets.

US Operations

The US team is not split into sub-teams but follows the same prioritization as the EU. When the US picks up EU tickets, they need to add notes at the end of the day and unassign them so the EU team can pick them up.

Additional Information

Umboto handles the first response for Professional, Standard, and Starter plans.

Assigning Tickets to Yourself or Others

When you need to assign a ticket to yourself or a colleague, follow these simple steps:

  1. Select the ticket: Click on the ticket you want to assign.

  2. Open the Assignment Menu: Look for a small upward arrow (shown below) next to the ticket information. Click on this arrow.

  1. Choose an Assignee: You'll see a list of options.

  2. Your name: Select this to assign the ticket to yourself.

Unassign a ticket

  1. Unassigned: Click this to mark the ticket as unassigned (useful if it was previously assigned incorrectly). You can then re-assign it following steps 1 & 2.
  2. List of colleagues: Choose the name of the colleague you want to assign the ticket to.

Assigning Tickets to the Correct Partner Group

Sometimes, a ticket might be assigned to the wrong partner group. Here's what to do:

Follow steps 1 & 2 above to open the Assignment Menu.

  1. Select the Correct Group: Instead of choosing a name, look for an option to change the team assignment. This is labeled as "Team". Select the correct partner group from the available options.

  2. Notify #swat-growth-channel: After correcting the group assignment, it's helpful to inform the #swat-growth-channel on Slack (or your designated communication channel) about the misclassification. This helps improve the system's accuracy in the future.

Blackops

General

This guide walks you through escalating a ticket to BlackOps second-level support when you've exhausted all other options.

Steps:

  1. Find the Ticket: Locate the conversation you want to escalate within the ticketing system.

  2. Initiate Escalation: Look for the "Back-office tickets" section in the upper right corner. Click the plus sign (+) next to it.

  1. Choose the Right Option: Select the appropriate BlackOps ticket type based on your situation:

    • BlackOps Cloud: Use this for issues with a Cloud project.

    • BlackOps: CR/AA: Choose this if a customer needs code review or architectural advice. (Fill out the Code Review Form before escalating.)

    • BlackOps Restore deleted project: Select this if a project needs restoration.

    • BlackOps: Issue with a Heartcore project: In case the project is a hardcore project, you will have to choose this option.

    • BlackOps: Issue with CMS - non Cloud: If the issue involves a non-Cloud CMS project, you should choose this option.

    • BlackOps: Question: This is for general questions your colleagues couldn't answer.

Filling Out the BlackOps Cloud Ticket

The required information is straightforward so just a few aspects are worth mentioning. 

  • Customer Consent for Restart 

Important

As one of the questions required when you create a BlackOps ticket asks the following: During the investigation, we might need to restart site. Did you get customers consent? (perhaps they have special hours on when it needs to be done etc) before submitting the ticket, confirm with the customer if BlackOps has permission to restart their environment (consider their preferred time for restarts).

  • Adding BlackOps to the Project:
  1. Go to the portal as shown in the guide's image.

  2. Click "Invite User."

     3. Select "Invite BlackOps."

BlackOps: CR/AA

BlackOps: CR/AA - when a customer needs/requires a code review or architectural advising.

If a customer needs assistance with code review or architectural advice, they'll first need to complete a code review form. Once they've submitted the form, you can then escalate the ticket to BlackOps second-level support.


This clarifies the process flow:

  1. The customer completes the code review form.

  2. You (the support agent) escalated the ticket to BlackOps using the completed form attached.


Code review form

Insert company name:

​Contact:

A name, email, and (preferably) phone of someone we can use as a contact during the process.

Solution setup:

Cloud URL (if any):

Versions of Umbraco:

Forms:

Deploy:

​Installed packages:

​Load balanced: If yes then provide more details about it Hosting: Where etc.

City and time zone:

Code for review (Specific!):

If you can point out which files/line numbers are causing issues we would greatly appreciate it.

Please either attach your code as a file to this email or share it via, say, a Google Drive link.

Purpose/What are you trying to achieve:

What is supposed to happen?

What challenges are you facing?​

​What/how have you tried? Current status/ideas about the situation?

Input/comments/thoughts:

Do you have anything else you would like our developer to know about?

BlackOps Restore deleted project

This is used wen for some reason, the project has been deleted and needs to be restored. 

The information needed by BlackOps team necessary for the project restoration can be seen below:

If the project you're trying to restore has been deleted, searching by its usual alias might not work in our system. Here's how to find the necessary information:

  • Search Slack Channels: Check the #uc-offboarding-response and #uc-provisioning Slack channels for the project's name or alias. These channels might contain historical records that can help identify the project ID.

Find Live Environment ID: Once you have the project ID, navigate to https://www.s1.umbraco.io/admin/support and enter the ID.

Locate Environment ID: Within the retrieved information, look for the "Environment ID" under the "Information" section. This environment ID is crucial for the restoration process.

Important

 Restoring a deleted project incurs a 1000 euro fee unless the deletion was caused by our team. In such cases, the restoration service is free. Please check here for prices in different currencies. 


  • When creating this ticket, you'll have options to specify the deleted project.

  • Search for the project ID in #uc-offboarding-response or #uc-provisioning Slack channels if unavailable in the system search.

  • Use https://www.s1.umbraco.io/admin/support to find the project using the project’s ID. (See guide's image for reference.)

  • Click on the project’s name in order to be able to find the Environment ID.

The last required information mentioned here is the restoration option:

Important

Important

When creating either a BlackOps / Incident ticket, make sure you have  provided as many details as possible, as this provides a clear overview of the issue and helps our colleagues from the second level support to investigate the issue.

Incident tickets

General

If you would like to link or create a tracker ticket for an incident click on the plus sign  (+) next to the Tracker ticket above the Back-office tickets:

Here you will have the option to link your current Intercom ticket to one existing Issue tracker or you have the option to create a new Issue tracker. The existing issue trackers are visible on the left side, while a new one can be created by clicking on the ‘+ Tracker Ticket’.

If you would like to proceed with creating a new issue tracker, press ‘Manage ticket types’. 

This will open a new window, here you should click on the ‘+ Create issue type’.

There are three buttons for selecting the type of ticket you want to create: Customer, Back-office, and Tracker. In this case, you would choose Tracker.

Once you select Tracker, there are two required fields to fill out: Name and Description.

Enter a clear and concise name for the Tracker ticket. This should be something that helps identify the issue you are tracking.

Provide a more detailed description of the issue in the Description field. This should include any relevant information that will help your team understand and address the issue.

After this has been done, the Issue tracker will become visible and now you can click on plus sign  (+) next to the Tracker ticket and chose your newly created Tracker issue with the Intercom ticket.

Closing tickets

Senarios

We close tickets based on five different scenarios to ensure efficient organization and communication.

Spam

  • If a ticket involves drugs, shady links, or anything else clearly considered spam, use the "Spam" Macro and send it. This will automatically close it.

Spam/Promotional:

  • If the opened ticket promotes unrelated services (SEO, event tickets, etc.) we classify this as a as promotional spam.

  • Use the "Spam/Promotional" Macro. This sends a pre-written message (feel free to tweak it) and closes the conversation after the message has been sent.

Issue Resolved

  • You or the customer solved the issue, and they have no further questions, you are free to close the ticket. Just make sure to inform the customer you are closing it.

Important

  1.  Before closing, ensure the ticket status is changed to "Resolved".
  2. If the customer has a new issue, politely request them to open a new ticket for better organization and clarity.

No Customer Response:

  • You sent an initial message and a follow-up, but the customer hasn't responded (2 messages sent by you with no reply).
  • Inform the customer that the conversation will be closed due to inactivity. Then, close the ticket.

Automatic Upgrade Message (Tuesdays)

  • On Tuesdays, we send automatic upgrade messages. For the customers between Custom Enterprise & Professional plans (existing SLA) when they have sent an auto-reply (e.g., "out of office") on Tuesday's upgrade message, skip the macros.
  • Write a quick note explaining the upgrade and closing due to their existing SLA and close the ticket normally.

Important

When you close a ticket, you should create a note using the macro Closing Note in which you should specify the Issue the customer had and the solution you have come up with if any. 

End of shift

At the ned of a shift

At the end of each shift, please follow these steps to ensure a smooth handover of tickets:

Create a Handing Over Ticket Note

At the end of each shift, please follow these steps to ensure a smooth handover of tickets:

  1. Create a Handing Over Ticket Note:

  • Use the existing Macro: Handing over ticket.

  • Specify the areas mentioned in the macro. This helps us understand the customer's issue without having to look through the entire ticket and saves time by clearly indicating the steps already taken in the investigation process and what the next steps are.

  • This is particularly important if, for example, you get sick or if the ticket needs to be picked up by someone else.

Enable Away Mode and Reassign Replies

  • At the end of your shift, it is crucial to enable the Away mode and reassign replies.
  • This action will put the ticket back in the specific groups in the View, allowing it to be picked up by someone else from the other shift if needed, or early in the morning when the new shift starts.

By following these procedures, we ensure that our team remains informed and that ticket handling is seamless across shifts.

Security tickets

Handle security tickets

Security issues should be reported as it’s described in our Trust Center. If we get a security ticket reported by a customer we should ask them to follow the procedure outlined in here.

How to handle tickets for EU & US

EU & US Ticket Prioritization

Pick up tickets in the following order, from highest to lowest priority:

1. Custom Enterprise

2. Standard Enterprise

3. Platinum Partner 

4. Gold Partner

5. Silver Partner

6. Professional On-Prem

7. Professional Cloud

8. Standard Plan

9. Starter Plan

10. Umbraco.com

11. Trial

EU Operations

At HQ, there are two teams: HQ1 and HQ2.


**HQ1 handles:**

- Custom Enterprise

- Standard Enterprise

- Platinum Partner

- Gold Partner

- Silver Partner

- Professional On-Prem

- Professional Cloud


**HQ2 handles:**

- Professional On-Prem

- Professional Cloud

- Standard Plan

- Starter Plan

- Umbraco.com

- Trial


EU teams need to pick up EU tickets from the US when they are unassigned and have notes and next steps included. If there is an urgent need from the customer, EU teams should hand over tickets to the US. Use Handover Hub for handing over urgent tickets.

US Operations

The US team is not split into sub-teams but follows the same prioritization as the EU. When the US picks up EU tickets, they need to add notes at the end of the day and unassign them so the EU team can pick them up.

Additional Information

 Umboto handles the first response for Professional, Standard, and Starter plans.

Tags in Intercom

Explanation of each tag and what they are used for


🔹 Tagging Structure in Intercom

To maintain efficient and structured support in Intercom, all tickets must be tagged appropriately. Tags are categorized into three levels:

  • 1st Level (Support) – General categorization for support issues.

  • 2nd Level (Support) – More detailed, technical tags for issue tracking.

  • 3rd Level (BlackOps) – Tags for escalated cases handled beyond standard support teams.


🟦 1st Level Tags (Tagged by Support)

Tag

Description

1st level - Cloud

For issues or questions related to Umbraco Cloud hosting or projects deployed on Umbraco Cloud.

1st level - Heartcore

Applies to tickets involving Umbraco Heartcore, including API usage, project issues, and related topics.

1st level - Product

Use when the query involves Umbraco add-ons such as Forms, Commerce, Deploy, Engage, Workflow, or UI Builder—including licensing questions for these products.

1st level - Accounting

For billing, invoicing, credit notes, and other financial or payment-related inquiries.

1st level - On-Prem

Used when a customer requests help with an on-premises installation of Umbraco.

1st level - Downtime

For reports or investigations of site downtime or when a customer needs help bringing a site back online.


🟨 2nd Level Tags (Tagged by Support)

Tag

Description

Deploy Error - Code Deployment

Issues where code changes (e.g. .cshtml, C# files) do not apply or reflect correctly in environments.

Deploy Error - Schema Deployment

Problems with deploying schema items (Document Types, Templates, etc.), including UDA extraction failures or schema collisions.

Deploy Error - Content Transfer

Failures or mismatches during content transfer between environments, including timeouts or unreachable environments.

Deploy Error - Content Restore

Issues with restoring content, such as schema mismatches, timeouts.

Deploy Error - Deployment Infrastructure

Infrastructure-related deployment problems like Kudu access, site extension issues, or auto-upgrade failures.

Deploy Error - Deployment Concept

General deployment issues not fitting specific categories, including conceptual questions or misunderstandings.

Heartcore Diverged Branch

Triggered when a repository diverged branch occurs in a Heartcore environment.

GraphQL

Covers all problems and questions about GraphQL usage within Umbraco Heartcore.

Webhooks

For any issues with webhooks in Heartcore.

Heartcore Migration

Problems related to migrating Heartcore projects from CMS v8 to v13.

UmbracoID

Concerns with UmbracoID login or authentication issues.

Cloud Portal

Any issues or bugs encountered within the Umbraco Cloud Portal UI not otherwise categorized.

CI/CD

Issues involving CI/CD pipelines, integrations, or automation workflows.

Azure

Covers problems involving Azure infrastructure, such as secrets, App Services limits, or noisy neighbours.

Cloudflare

For DDoS, bot traffic, or any queries related to Cloudflare services integrated with Umbraco Cloud.

Usage

Covers inquiries related to bandwidth, media storage, domain setups, and similar usage metrics.

CMS

For core CMS functionality issues, including editing behaviour, backoffice errors, etc.

Rest API

Covers technical issues with REST API in Umbraco Heartcore.

Platform / Infrastructure

General issues involving the underlying platform or hosting infrastructure.

Licenses

Questions about license validation, domain changes, or creation requests for any Umbraco add-on.

DXP - Forms

Issues specific to Umbraco Forms.

DXP - UI Builder

Issues specific to Umbraco UI Builder.

DXP - Commerce

Issues specific to Umbraco Commerce.

DXP - Workflow

Issues specific to Umbraco Workflow.

DXP - Engage

Issues specific to Umbraco Engage.

DXP - Deploy

Deployment issues specifically tied to the Deploy add-on, especially for on-prem use.

NN Perpetrator

Identifies a web app causing performance issues for others in shared infrastucture ("Noisy Neighbour").

NN Victim

Marks tickets where the customer is impacted by a noisy neighbour in shared infrastructure.


🟥 3rd Level Tags (Tagged by BlackOps)

These are escalation tags used only by the BlackOps team when issues must be resolved by developers or internal specialists.

Tag

Description

PE - DXP

Escalation involving the Digital Experience Platform (DXP) tools.

PE - CMS

Escalation involving the core CMS product.

PE - Cloud

Escalation related to Umbraco Cloud platform.

PE - Heartcore

Escalation for critical issues in Umbraco Heartcore.

PE - Cancelled Escalation

Used when an escalation is withdrawn after resolution or reclassification.


Merge tickets

Merging tickets

When you come across multiple tickets/conversations from the same customer created at the same time, they are likely duplicates.

After verifying that the tickets/conversations are indeed duplicates, you can merge them into a single ticket.

Before merging, identify the primary ticket — the one that contains the most detailed information about the issue.

  • If both tickets/conversations contain the same level of detail, you can choose either one as the primary ticket.

After identifying the primary ticket, open the secondary ticket(s) and add the Merged ticket’ tag.

  • This tag ensures that the customer will not receive a feedback survey once the tickets are merged.

Once the secondary ticket(s) have been tagged as Merged ticket', you can merge them into the primary ticket.

Before merging tickets, locate the primary ticket or conversation ID to confirm that you are merging the correct tickets.

  • Ticket IDs are displayed at the top of the ticket, next to the customer’s name and company.

  • Conversation IDs are available in the right-hand side panel under Conversation attributes.

Now that you have confirmed the primary ticket ID, click the three dots at the top of the secondary ticket(s) and select 'Merge into…'

  • Search for the ticket or conversation ID to locate the correct ticket, then click on it.

After selecting the tickets/conversations to be merged, you will have the option to review them to confirm which is the primary and which is the secondary, and to ensure you have selected the correct tickets.

Important

Merged tickets cannot be un-merged, so take your time to carefully review both tickets/conversations before confirming.

Once you have reviewed the tickets, click Confirm to complete the merge.

The ticket/conversation is now merged.

You can continue the conversation with the customer in the primary ticket/conversation.