Table of Contents

Collision errors

Fixing collision errors

General

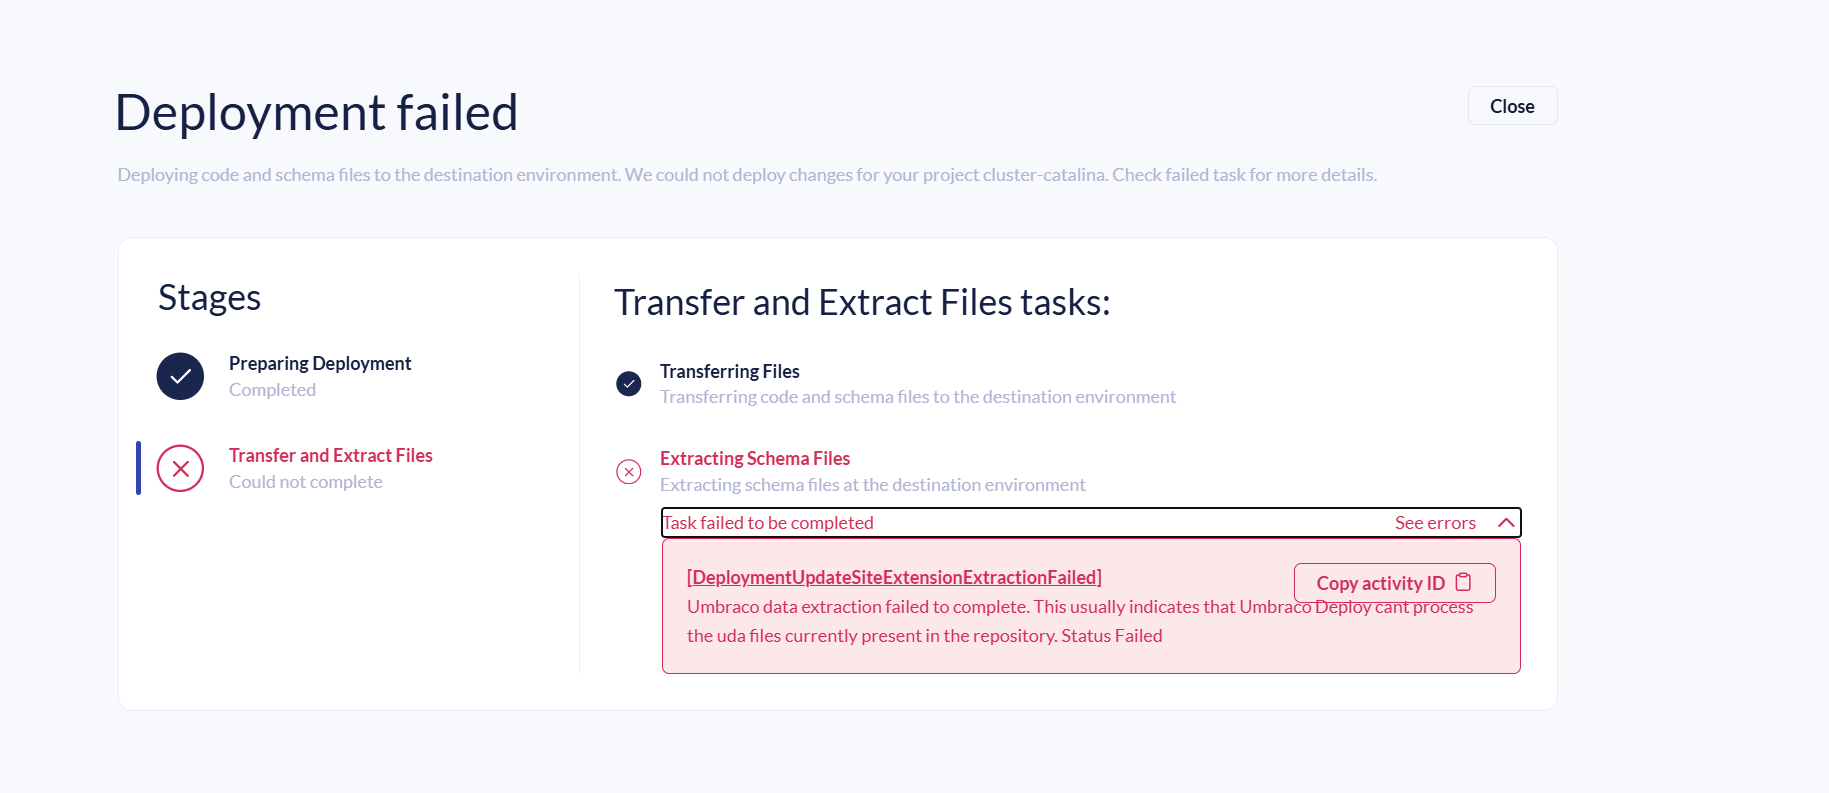
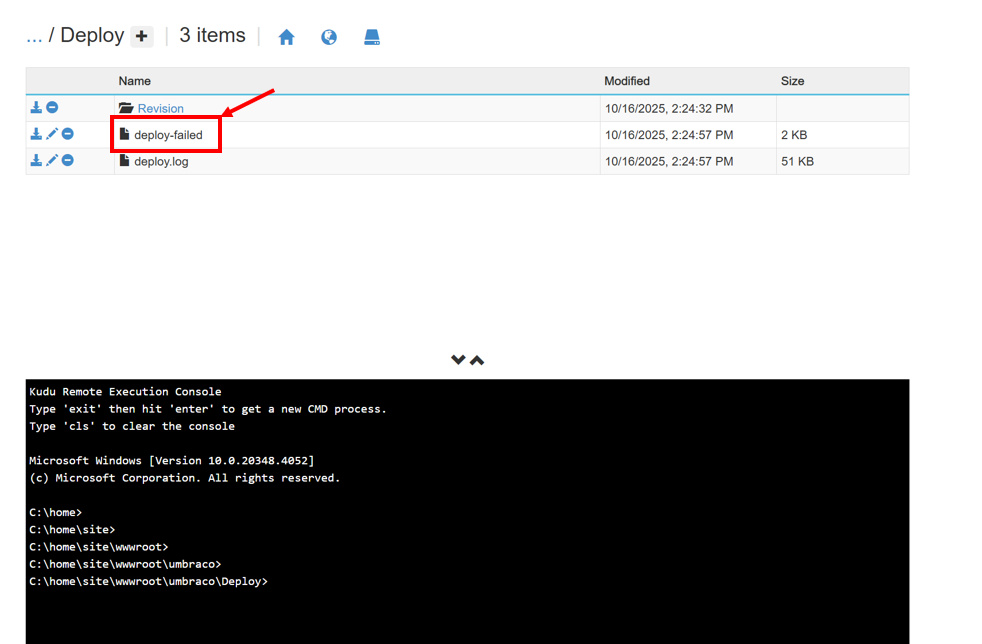
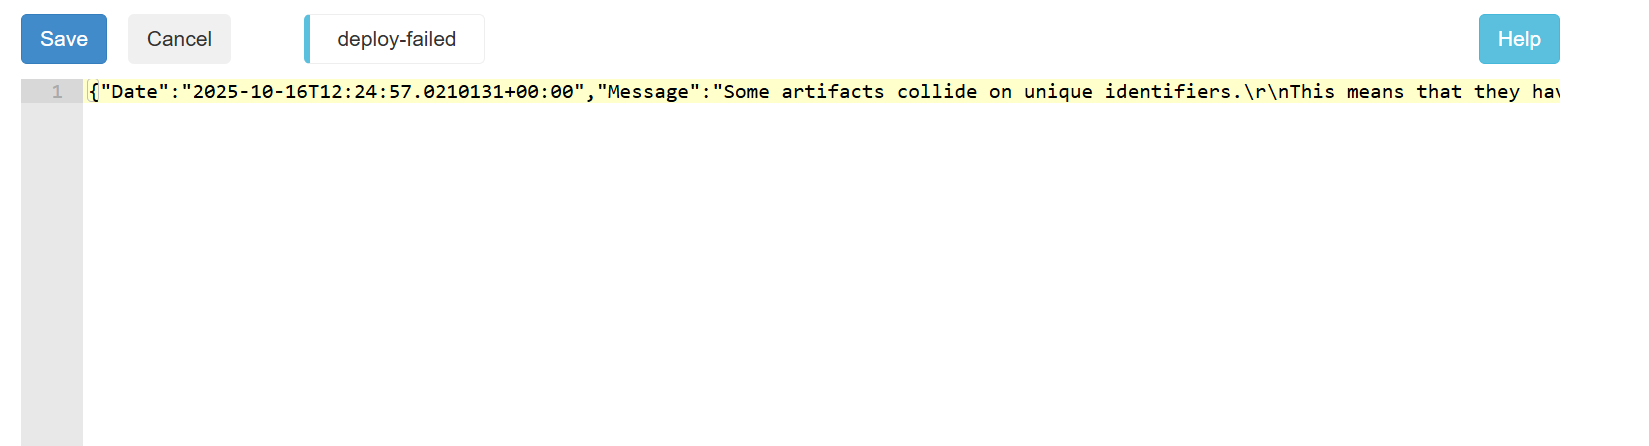
Umbraco Deploy uses .uda files to serialize schema and configuration entities (document types, data types, media types, etc.) into source control–friendly text files.
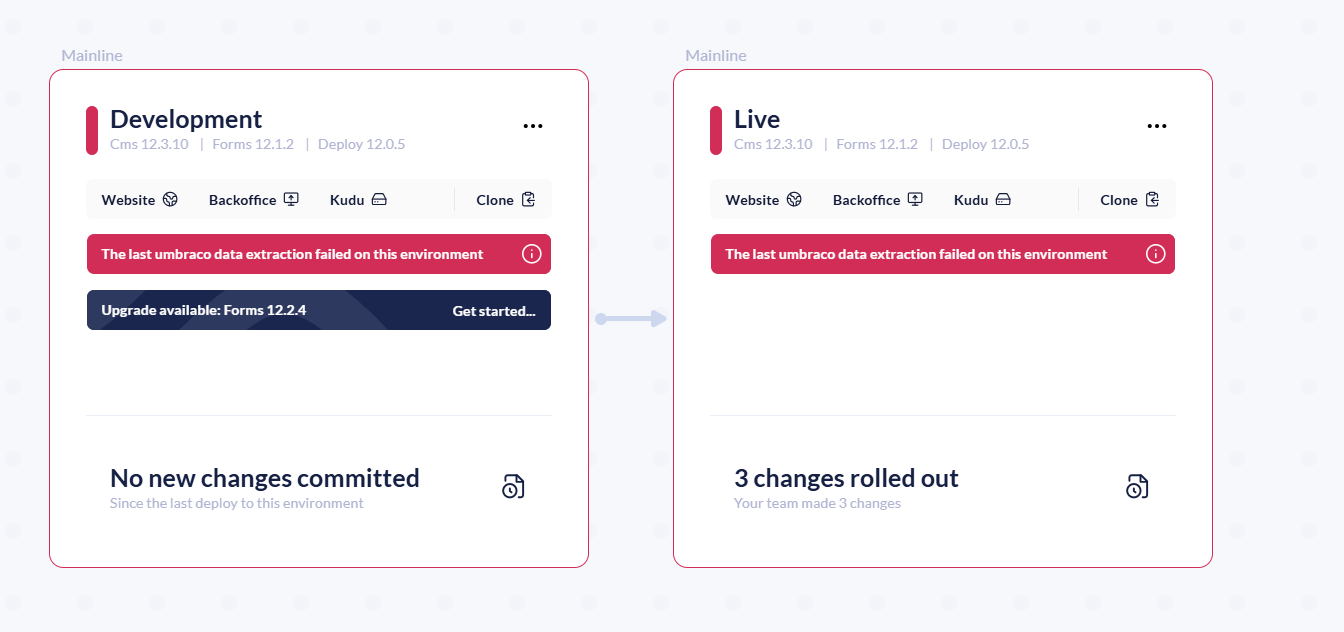
When you deploy (e.g., push/pull schema changes between environments), Umbraco compares the UDA files with what’s in the target database.

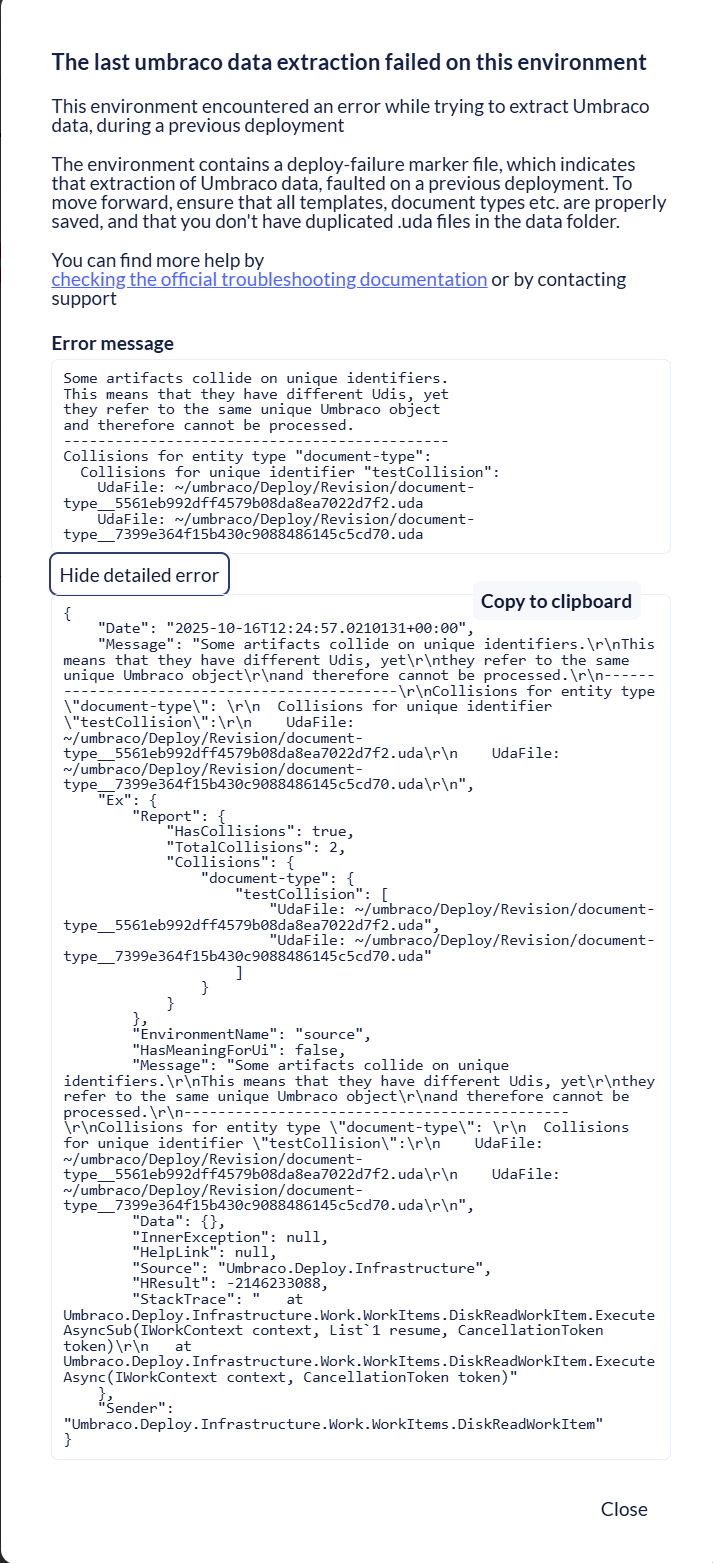
A collision occurs when Deploy detects that:

  • Two entities have the same alias/name, but different GUIDs/UDIs.

Example Scenario

Two developers create the same document type (“Article”) independently in separate environments:

  • Dev A’s version has GUID a111...

  • Dev B’s version has GUID b222...

  • When merging UDAs, Umbraco Deploy detects two “Article” types with different identifiers → collision error.

Diagnosis — “Some artifacts collide on unique identifiers”

When a deployment fails with “Some artifacts collide on unique identifiers”, Umbraco Deploy has found two different .uda files that both claim to be the same Umbraco object (same alias/UDI) but with different keys. You can surface and read the error in three places (plus a quick way to reproduce):

Umbraco Cloud Portal → Failed deployment details

  • After a failed deploy, you will be able to see an error similar to this one below.

When going back to the environment, you will be able to see Extraction errors on both environments. The reason why you see it on both environments is because when deploying it first pulling the content from Live to Dev and then it pushes it. 

Now, if you click on the info button, you will be able to see multiple details about the collision errors. 

  • You’ll see a JSON block like in the screenshot showing:

    • entity type (e.g., document-type)

    • unique identifier (the alias; e.g., testCollision)

    • the two conflicting UDA paths, e.g.
      ~ /umbraco/Deploy/Revision/document-type__5561eb992dff4579b08da8ea7022df72.uda
      ~ /umbraco/Deploy/Revision/document-type__7399e364f15b430c90888486145c5cd70.uda

Copy those two file paths.

Another place where you can check if there is a collision erros is Kudu (Advanced Tools) → /site/wwwroot/umbraco/Deploy

  • Go to KuduDebug consolesite/wwwroot/umbraco/Deploy.

  • You will see a deploy-failed marker file. Click it to view the same JSON error.

The error you are seeing can be a bit hard to visualize, so you are welcome to use the Stack Trace Formatter for an easier visualization: https://elmah.io/tools/stack-trace-formatter/

  • Open the Revision folder (in either repository or the wwwroot) to confirm the two UDA files listed in the portal.
    (This confirms the destination environment received two competing definitions for the same artifact.)

Tip: Deleting deploy-failed only clears the marker; it does not fix the underlying collision.

Finally, you will usually see the error in the Backoffice → Deploy → Deploy Status In the Backoffice, go to Deploy → Deploy Status → view details. If there is no error there, you can also try Updating Umbraco Schema which will result in this error showing up again. 

  • You’ll see the same report: entity type, unique identifier/alias, and the two UDA files that collide.

  • This is often the easiest place to copy the exact alias (e.g., testCollision) to search your repo.

How to Fix a Collision Error in Umbraco Deploy (UDA Files)

Go to the UDA Files in wwwroot

Navigate to your Revision folder in the wwwroot which can be found this:  C:\home\site\wwwroot\umbraco\Deploy\Revision>  (or equivalent) folder where your .uda files are stored.
Locate the UDA files that are in collision, usually reported by Umbraco Deploy in the deployment error logs mentioned above.

Tip: You’ll typically see two files with similar names or aliases for the same document type.

Backup the Colliding Files

Before making any changes, save a copy of both UDA files somewhere safe (e.g., on your desktop).
This ensures you can restore them if needed, such as repeating the process.

Delete the Conflicting Files

After backing them up, delete both of the colliding .uda files from the C:\home\site\wwwroot\umbraco\Deploy\Revision>  folder.

Recreate the Document Type in the Backoffice

Open your Umbraco BackofficeSettingsDocument Types, and re-save the document type that was involved in the collision.

This action regenerates a new UDA file for that document type, aligned with the database definition. This means that now, you will see only one UDA file in the wwwroot

Run an Echo Deploy

Run the command below here:   C:\home\site\wwwroot\umbraco\Deploy:

echo > deploy

You should now see the correct UDA file being used.

You can read more about the manual extraction here: https://docs.umbraco.com/umbraco-cloud/optimize-and-maintain-your-site/monitor-and-troubleshoot/power-tools/manual-extractions

You can also trigger the same process by simply clicking on the Update Umbraco Schema in the backoffice:

Clean Up the Repository

Once deployment completes successfully:

  • Delete the unused UDA file (the one you don’t want to keep) from the repo.

  • Commit and push these changes directly to your version control system.

Using git add and git commit in the Umbraco Repository

When you’re working in your Umbraco site’s repository (for example:
C:\home\site\repository>), you can use Git commands to save your changes.

Stage all changes
Run this command to include all modified, added, or deleted files in the next commit:git add .

The . means “add everything in the current folder and subfolders.”

Commit the changes with a message
Then create a commit that describes what you did:

git commit -m "Fixed UDA collision and cleaned up document type files"

The -m flag lets you write a short message explaining the update.

Important

If you don’t commit the changes in all environments, the next time you deploy from a previous environment (for example, from Dev → Staging), your UDA file changes can be overwritten by the older versions still tracked in Git.

So always:

  1. Run

    git add .
  2. Run

    git commit -m "Fix UDA collision"

Repeat on Staging

Perform the same cleanup steps on your staging environment to ensure both environments are aligned.

Decide Which File to Keep

If both environments have different versions of the same document type, decide which version is correct and consistent.

  • Keep the valid UDA file.

  • Delete the unwanted one (and optionally, delete the corresponding document type in Umbraco if it’s no longer needed).